I just added another Blog Link to the right side bar, "Easy Electronics" - it is written in Russian, but Hobby HomeBrew Electronic is a universal language - and Google Translates will help with the details.
After reading several of the posts, I think I will really enjoy this link.
-
Sunday, October 10, 2010


A Special Day
Today is a Special Day for many reasons, but three reasons are special to me.
-
- At one moment in time, today's time can be written as: 2010-10-10 10:10:10.1010, for a Geek this has to be a special point in time.
- This would have been my Father's Birthday (89) and in his honor each year I declare this day as Hero Day. My Father is my favorite Hero (see previous posts). I celebrated his Birthday today at 10:10:10.1010am local, he would have liked that, even without computers, he was very much a Geek of his time.
- Because I use Ubuntu for most of my computing needs, today is also special, because of the new revision of Ubuntu was released. Note: this new release was specially timed to coincide with this day of Oct 10th. Normally, release numbers reflect the year and the month, coincidently this year it ALSO reflect the month and the day! More than likely, this contrived coincidence will not happen again. Normally, releases come out about once each six months. The last release was Ubuntu 10.04, representing Apr 2010. But, maybe they will slip the scheduled release of 11.10 to November? . . . Nah.
-
Sunday, October 3, 2010
QRSS, WSPR on SDR
I could not sleep about 4AM, so I got up to listen to my Softrock RX Ensemble SDR via MS XP, tuning to 10.1387MHz for both the LO and the Tune frequency provides the 1300 to 1600Hz audio signal for both the QRSS and WSPR decoders.
Normally, the audio would be decode by additional processes like ARGO (1300 to 1400Hz) for QRSS, and the WSPR program (1400 to 1600Hz) for WSPR. To re-route the audio to those two programs requires an additional sound card, or a "virtual audio cable" (VAC). SDR and the two decode programs can run concurrently, assuming WSPR is configured for receive only. The SDR audio bandpass filter makes it very easy to select the desired signals.
I do not have VAC and my second sound card was not working, so I slowed down the SDR audio water fall, and averaged two adjacent scans, and then was able to visually decode "KC7VHS" on QRSS. Several other QRSS signal were seen, but I was not able to decode them. Also, WSPR signals were seen, but obviously I could only observe.
My gaol is to reestablish my QRSS Grabber and report WSPR Spots with this receiver (at yet another location), but time for; an antenna installation, and a disk replacement tasks, are holding up progress. The computer system will be Ubuntu, as it provides multiple virtual X displays that the decode programs can run in. ARGO requires it's own unobstructed window as it uses "screen scrapes" to obtain images that are published by an Internet Grabber Server. Pop-ups makes using MS Windows to run ARGO some what difficult on a remote system, especially when the desire is to have more windows displayed than space on the screen.
-
Normally, the audio would be decode by additional processes like ARGO (1300 to 1400Hz) for QRSS, and the WSPR program (1400 to 1600Hz) for WSPR. To re-route the audio to those two programs requires an additional sound card, or a "virtual audio cable" (VAC). SDR and the two decode programs can run concurrently, assuming WSPR is configured for receive only. The SDR audio bandpass filter makes it very easy to select the desired signals.
I do not have VAC and my second sound card was not working, so I slowed down the SDR audio water fall, and averaged two adjacent scans, and then was able to visually decode "KC7VHS" on QRSS. Several other QRSS signal were seen, but I was not able to decode them. Also, WSPR signals were seen, but obviously I could only observe.
My gaol is to reestablish my QRSS Grabber and report WSPR Spots with this receiver (at yet another location), but time for; an antenna installation, and a disk replacement tasks, are holding up progress. The computer system will be Ubuntu, as it provides multiple virtual X displays that the decode programs can run in. ARGO requires it's own unobstructed window as it uses "screen scrapes" to obtain images that are published by an Internet Grabber Server. Pop-ups makes using MS Windows to run ARGO some what difficult on a remote system, especially when the desire is to have more windows displayed than space on the screen.
-
Sunday, September 26, 2010
More QR Code
Here are just a "few" QR-Codes that I found via Google, they are apparently everywhere, if you know where to look.
http://www.google.com/images?hl=en&expIds=17259,17315,23628,23670,25834,26328,26569,26751,26762&sugexp=ldymls&tok=wJPNdc6pYq78MMGEUwH2Bw&xhr=t&q=qr+code&cp=2&um=1&ie=UTF-8&source=univ&ei=pSSgTOTxMZSisQOYrP3VAQ&sa=X&oi=image_result_group&ct=title&resnum=7&sqi=2&ved=0CFsQsAQwBg&biw=1059&bih=705
All of the above very long URL is contained in the following QR-Code image.

The reason that I started noticing QR-Codes, is because QR-Codes are the method of choice for sharing data; contacts, URLs, Apps, and more, between the Android Smart Phones. One phone displays the QR-Code, the second scans the first phone's display and decodes the results , effectively transferring information.
Using a "Bar Code App", any QR-Code can be decoded, regardless of it size, location, and display device, assuming that it can be seen via phone camera. The image can be on a small stamp, or the side of a blimp - if it can be photographed, it can be decoded. Apparently, QR-Codes are used extensively in Japan, on everything from small products, to large Billboards and Neon signs.
If you have an Android Smart Phone, you too can easily read the above code and jump to the web page. Note; maybe other phones can do the same thing? For Android, see the app:

There is a Google Chrome Plugin that coverts any URL line to a QR-Code, which makes it easy to share an arbitrary page to a phone. Other online apps can be used to decode QR-Codes for any PC.

So, . . what does this have anything to do with Ham Radio? . . . Well, a lot, . . . as my new HTC Android Phone also contains several good Ham Radio Apps; like EchoLink, Exam Test Questions, APRS, CW Trainer, GPS Maping and a lot more. Oh, by the way, it can also receive and place phone calls :-) !!!
So, who will be the first to decode the secret word in the QR-Code of my previous post ???
Update
Link to some QR Code history (thanks to, Colin - G6AVK):
-- Home Page: https://WA0UWH.blogspot.com
http://www.google.com/images?hl=en&expIds=17259,17315,23628,23670,25834,26328,26569,26751,26762&sugexp=ldymls&tok=wJPNdc6pYq78MMGEUwH2Bw&xhr=t&q=qr+code&cp=2&um=1&ie=UTF-8&source=univ&ei=pSSgTOTxMZSisQOYrP3VAQ&sa=X&oi=image_result_group&ct=title&resnum=7&sqi=2&ved=0CFsQsAQwBg&biw=1059&bih=705
All of the above very long URL is contained in the following QR-Code image.
The Above URL
Using a "Bar Code App", any QR-Code can be decoded, regardless of it size, location, and display device, assuming that it can be seen via phone camera. The image can be on a small stamp, or the side of a blimp - if it can be photographed, it can be decoded. Apparently, QR-Codes are used extensively in Japan, on everything from small products, to large Billboards and Neon signs.
If you have an Android Smart Phone, you too can easily read the above code and jump to the web page. Note; maybe other phones can do the same thing? For Android, see the app:
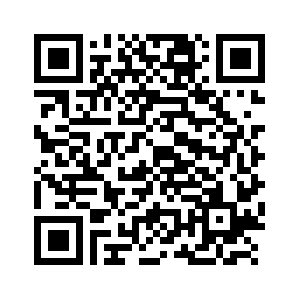
This mode of image communication may have a place in Ham Radio. Maybe a new form of QRSS or MEPT??
Update, yes it has now been done, See:

Update, yes it has now been done, See:
I plan on creating a QR-Code image for the back of my van, but so far, I have not thought of a good choice for content :-)
Update
Link to some QR Code history (thanks to, Colin - G6AVK):
-- Home Page: https://WA0UWH.blogspot.com
Saturday, September 25, 2010
For The Geek in Me
For all of the Geeks - here is todays post:

UPDATE

As you can see by the time stamp below, I have been up, much too late.
UPDATE
I did not expect a QR-Code reply :-), but At 12:13AM, Jeff - KO7M, Replied with:
-
Thursday, September 16, 2010
In PIC Heaven
OK, I am now in PIC Heaven.
Long ago, I have used the Microchip 12C509 for many projects, but it is time to update.
In an attempt to find a PIC for some future projects, I ordered and received a few of the most popular.
Each Kit has a lot to offer; these are my initial reactions:
I will update this post as I learn more.
.
Long ago, I have used the Microchip 12C509 for many projects, but it is time to update.
In an attempt to find a PIC for some future projects, I ordered and received a few of the most popular.
- Microchip - PICkit-2 with a PIC16F690 Evaluation Proto Board ~ $40.00
- ATmel - Arduino Duemilanove Development and Evaluation Board ~ $30.00
- Solarbotics - Ardweeny Backpack (a small Arduino compatible) ~ $10.00, Requires USB-to-6Pin Programming Adapter ~ $14.00
- Texas Instruments - MSP430 Launch Pad, Development and Evaluation Board = $4.30
with shippingat Mouser (how can they afford that!!!)
- PJRC - Teensy USB Development Board - $18.00
Each Kit has a lot to offer; these are my initial reactions:
- Microchip - has a lot of supporting chips and I think they have be around longer. Multiple programs to install and/or download. This should be easy, but I am have a hard time getting anything to work. The Docs and Examples refers to different PIC than received?
- ATmel Arduino - is VERY easy to program and it is quick to have something useful running. Just download one ZIP file and execute the main program. The program contains links to read-only example files and a link to your project work space - very nice!
- Solarbotics Ardweeny - is very small and the same ease of use as the Arduino and can be reduced to just the chip. A 6-pin programmer is needed, that is - a special USB to Serial Adapter (now on order).
- Texas Instrument MSP430 - Very inexpensive (evaluation board most function per $) - a little more difficult to program, but the chip has many built-in features, like on chip temperature. Two software packages are necessary to download and install; C and the Assembler. Demo code is a little difficult to find and set up - I will have to learn more.
- PJRC Teensy - USB Development Board - It has onboard USB for programming and data transfer (I have this board on order)
I will update this post as I learn more.
.
Wednesday, September 8, 2010
Advancements DLP to PCB
It looks like there has been some major advancements for Mark's Direct Laser Printer (DLP) to PCB for homebrew hobbyist. See my previous posts.
Most experiments attempting to laser print directly onto PCB material evolves modifying the printer (cutting and removing parts) to straighten the paper (or PCB) path through the printer. Also, this normally requires the toner fuser to be removed, because it often contains slight "S" turns which is normally used to maximize heat transfer. Stiff PCB material will not pass through without modifications. A different method of image "affixing" is necessary.
In general; Jim KI6MZ's modification to the "carrier" makes for better image prints onto the PCB by grounding. As before the image is very fragile and require simi-melting in a 400 deg oven to affix the image before etching.
And now, Jim has also found a way to affix the image WITHOUT heat!
Jim suggests that the image can be affixed by placing the PCB with image in a container of Acetone Vapors for about two minutes. Removing it gently, air drying and it is ready for etch .
This sounds too good to be true, I am going to have to try this !!
Links to the details and thread are here.
I will report my progress using this method.
--
Most experiments attempting to laser print directly onto PCB material evolves modifying the printer (cutting and removing parts) to straighten the paper (or PCB) path through the printer. Also, this normally requires the toner fuser to be removed, because it often contains slight "S" turns which is normally used to maximize heat transfer. Stiff PCB material will not pass through without modifications. A different method of image "affixing" is necessary.
In general; Jim KI6MZ's modification to the "carrier" makes for better image prints onto the PCB by grounding. As before the image is very fragile and require simi-melting in a 400 deg oven to affix the image before etching.
And now, Jim has also found a way to affix the image WITHOUT heat!
Jim suggests that the image can be affixed by placing the PCB with image in a container of Acetone Vapors for about two minutes. Removing it gently, air drying and it is ready for etch .
This sounds too good to be true, I am going to have to try this !!
Links to the details and thread are here.
I will report my progress using this method.
--
Tuesday, September 7, 2010
WinradHD Running on Ubuntu 10.04 via Wine
Until recently I had been listening to my Softrock RX Ensemble on my one-and-only Windows XP Desktop Computer, all of my other computers have been converted to Ubuntu Linux.
Today I found out that "WinradHD" I/Q Decoder will run via "Wine" on Ubuntu 10.04. I have Ubuntu on my HP Pavilion Laptop, which has a Stereo Mic Input Jack (a surprise to me). The Laptop decodes the SDR I/Q signals very nicely, with a very low noise floor.
My initial test configuration used two computers; one (window XP) to changed the Ensemble LO Frequency via a USB connection, and the second (the laptop) to run WinradHD and provide audio output.
Then, via the Internet, I found the "usbsoftrock" deamon for Linux, which is a kind of driver/program for the Si570. It is like a command-line version of a combination of "USB Driver", "CFGSR", and "SRDLL" as used on Windows XP, and as previously described. Usbsoftrock runs on Ubuntu along with WinradHD.
Usbsoftrock allows changes to the Si570 frequency via a command-line command on the Ubuntu Laptop, for example:
Note: A pre-compiled "usbsoftrock" Ubuntu package can be found as described on Steve Conklin, AI4QR web page and which was created by Jonathan, AF6YF (now N6JU) - Thanks Jonathan.
-
Today I found out that "WinradHD" I/Q Decoder will run via "Wine" on Ubuntu 10.04. I have Ubuntu on my HP Pavilion Laptop, which has a Stereo Mic Input Jack (a surprise to me). The Laptop decodes the SDR I/Q signals very nicely, with a very low noise floor.
My initial test configuration used two computers; one (window XP) to changed the Ensemble LO Frequency via a USB connection, and the second (the laptop) to run WinradHD and provide audio output.
Then, via the Internet, I found the "usbsoftrock" deamon for Linux, which is a kind of driver/program for the Si570. It is like a command-line version of a combination of "USB Driver", "CFGSR", and "SRDLL" as used on Windows XP, and as previously described. Usbsoftrock runs on Ubuntu along with WinradHD.
Usbsoftrock allows changes to the Si570 frequency via a command-line command on the Ubuntu Laptop, for example:
$ usbsoftrock set freq 10.140Status can be listed via:
$ usbsoftrock statusI need to find the magic to control the Si570 via "usbsoftrock" directly from "WinradHD" on Ubuntu. Using the keyboard to set a Frequency is not exactly fun.
Note: A pre-compiled "usbsoftrock" Ubuntu package can be found as described on Steve Conklin, AI4QR web page and which was created by Jonathan, AF6YF (now N6JU) - Thanks Jonathan.
-
Friday, September 3, 2010
USB Mini-B Connector Received

Just received the USB Mini-B connectors (P/N 538-54819-0572) from Mouser. Hopefully sometime soon I will have time to modify the artwork to include this connector for my Marker/Beacon/CW project. See previous post.
Monday, August 30, 2010
Project Connectors - Old USB Standard
The world of USB Connectors has gotten a whole lot bigger, or smaller, depending on your prospective.
I need a connector for a new project that I am planning. The connector must be as small as possible as there is very little space on a 1 x 1.2 inch PCB.

The two connectors that I am considering using for this project are; the "Mini" or the "Micro" USB connectors. These are the smallest connectors that I have found. I know this will violate the "standards", by using them in this way, but it is my personal project and I will just have to not plug them into a standard USB fixture or cable.
In researching these connectors, I have learned a lot about the USB standards, and what that means for use with our smart phones and personal devices. A couple of things that I have learned are:


The good news is; because the USB connector is not only for data transfer, it also used for device battery "charging", so we now have a "auto and home" charging standard for personal devices - we are no longer condemned to multiple charger-cord hell. Now we have one charging cord plug standard for all new personal devices. I have been told that many new cars now have USB charging connectors as standard equipment.

This HomeBrew project (and similar follow-on projects) will be used as an Transmit Exciter for the QRP HF PA as planned in a previous post.
I will provide more details as my Home Brew Project continues.
Note: For my future project reference, the Drawings and Photos were obtained from the Molex Catalog and Product Guides, at the following link:
The "Mini" and "Micro" USB connectors can be found on Mouser.com Catalog Page 1252
-
I need a connector for a new project that I am planning. The connector must be as small as possible as there is very little space on a 1 x 1.2 inch PCB.
- On the PCB there will be; a stereo audio connector (for CW Keying), a push button switch, a crystal, and a 4 (or 5) pin connector which will occupy the majority of the space. The rest of the space will be used for; the Voltage Regulator and Decoupling Caps, 2N3904 RF Oscillator and Trimmer, PIC FSK Modulator, Status LED, Power Connector, and Antenna Connection.
- Most of the resistors will be of size 0603, and cap's will be 0804 mils, most traces will be 8/8 mils.

Proposed Project
- The project is similar to my other 9 Volt Battery Frequency Markers, but this will be a smart QRSS Beacon. The required connector for; beacon mode, speed and message content programming. This thing will be used in stand-alone Beacon mode and casual interactive CW use. My goals is to provide project documents so other, like minded people, can try their hand at this micro-circuit.
The two connectors that I am considering using for this project are; the "Mini" or the "Micro" USB connectors. These are the smallest connectors that I have found. I know this will violate the "standards", by using them in this way, but it is my personal project and I will just have to not plug them into a standard USB fixture or cable.
In researching these connectors, I have learned a lot about the USB standards, and what that means for use with our smart phones and personal devices. A couple of things that I have learned are:
- We have China to thank for requiring the "standard" "Micro" charger and data transfer connectors on our new cell phones (and personal devices), they said make the charger standard or do not try to sell it in China (Why couldn't we have done that?). And yes, the standard is the new smaller "Micro" connector and not the "Mini" connector that is currently found on our "slightly" older personal devices.
- The first (and much larger) standard USB "A" and "B" connectors use four wires; +5 Volts, Gnd, +Data and -Data. The large flat "A" connector is normal found on the side of computers, and the smaller almost square "B" connector is normally used on peripherals. The connector establish the "Master/Slave" communication protocol.
USB A
Typically Found on Computers
USB B
Typically Found on Peripherals
- Adapters cables with one large "A" connector are available for connection to a second small "Mini" and "Micro" connectors. These smaller connectors have five (5) pins for connection, the first four (4) are the same as the larger USB "A" and "B" connectors, on some hardware the fifth pin is shorted to ground to indicate which device is to be, "Master" or "Slave" ( I don't remember the details of which is which). Also, the standard requires that only one data connector is allowed on any new personal device (Note, a second connector is allowed, but it can only be used for additional power). UPDATE: the new pin was added at position number 4, old pin 4 became pin five, see the wikipedia doc.
USB - Mini AB
Previous Generation Standard
USB - Mini B
Previous Generation Standard
Note: the Corner Notches
- The designators for these "Mini" and "Micro" connectors are "AB" and "B". The "AB" connector is rectangular and accepts both the "AB" and "B" male plugs, The "B" connector accepts the "B" plug and has corner notches as to reject the "AB" male plug.
- The current China Standard is the "Micro" connector (below) for all new personal devices. It is similar to the "Mini" connector (above), but about 1/2 the size (unlike the included drawings would imply).
USB - Micro AB
Current Standard
USB - Micro B
Current Standard
The good news is; because the USB connector is not only for data transfer, it also used for device battery "charging", so we now have a "auto and home" charging standard for personal devices - we are no longer condemned to multiple charger-cord hell. Now we have one charging cord plug standard for all new personal devices. I have been told that many new cars now have USB charging connectors as standard equipment.

The Current Standard
A, B and Micro
A, B and Micro
What does this mean for my project; "Mini" cables and Connectors are available in surplus and new stock, and because they are no longer new, and now a deprecated standard, . . . so now - I am going to use them in my projects!
This HomeBrew project (and similar follow-on projects) will be used as an Transmit Exciter for the QRP HF PA as planned in a previous post.
Note: For my future project reference, the Drawings and Photos were obtained from the Molex Catalog and Product Guides, at the following link:
The "Mini" and "Micro" USB connectors can be found on Mouser.com Catalog Page 1252
-
Subscribe to:
Posts (Atom)