Showing posts with label K1EL. Show all posts

Sunday, February 13, 2011

Back to Soldering

I have been having fun with the FUNcube (see previous posts) and ignoring my soldering iron lately, to solve that problem I decided to complete the design of my QRSS Beacon. This project has been in the  design stage for sometime, I have been working on; Designing the Circuit, Finding Parts, Creating the Schematic, and PCB layout.

This is will be the first of two Beacons using this design:
  • The first is a prototype or proof of concept
  • The second (if all goes well) will be mounted within an insulator of a dipole, or maybe launched with a balloon.

For this design I am using a K1EL Keyer, which with be programmed with a CW KEY and then put into QRSS Beacon Mode.


As stated before, I enjoy building very small projects:

"As small as I can - to see if I can - as long as I can, . . . see"

I have created similar QRSS Beacons before, this is the first which can be programmed just before use, or used interactive via a CW Key for demonstrations.

This board measure 1.25 by 1.05 inches. The small traces are 8 mils, clearance 12 mils, the text font is 3pt, the ground grid is 8 mils on 36 mil center. I wanted the board to be only 1.0 inch wide, but just could not squeeze the last .05 inches from the width.

So far, as reported here, I have created the board using Toner Transfer, and plated it with solder wipe. Parts with be added for the next blog post.

After Lamination, All Goes Into Warm Soapy Water


Toner Transfer Paper Floats Away

Previously I have normally use a soft spoung brush method of etch, this time I am going to try something new (as seen on the web) - I going to try the "Etch in a Bag" method.

Ready for Etch

Etch in a Zip Lock Bag

With this method, it is easy to watch the progress and mix the solution

I found this method very easy and uses very little etch. I was able to heat the etch while in the bag, by running hot water over it - it etched the board very fast. Also, I noticed that it is best to NOT allow the etch near the zipper - it will creep out while zipping and un-zipping, and will make a mess.

Ready for Resist Removal, I use warm running water and Scotch Bright


Solder Wipe with lots of Rosin

Solder Wipe is done by sliding a short section of Solder Wick over the traces with the tip of the soldering iron. With very little solder on the wick, solder coats the traces, and excess is removed by the same wick in a wiping action. This is best done in the presents of plenty of rosin flux.

After clean up; with Alcohol and more Scotch Bright (to remove solder shine), and a new thin layer of Rosin for protection. If un-removed, the solder shine is very distracting while placing components.
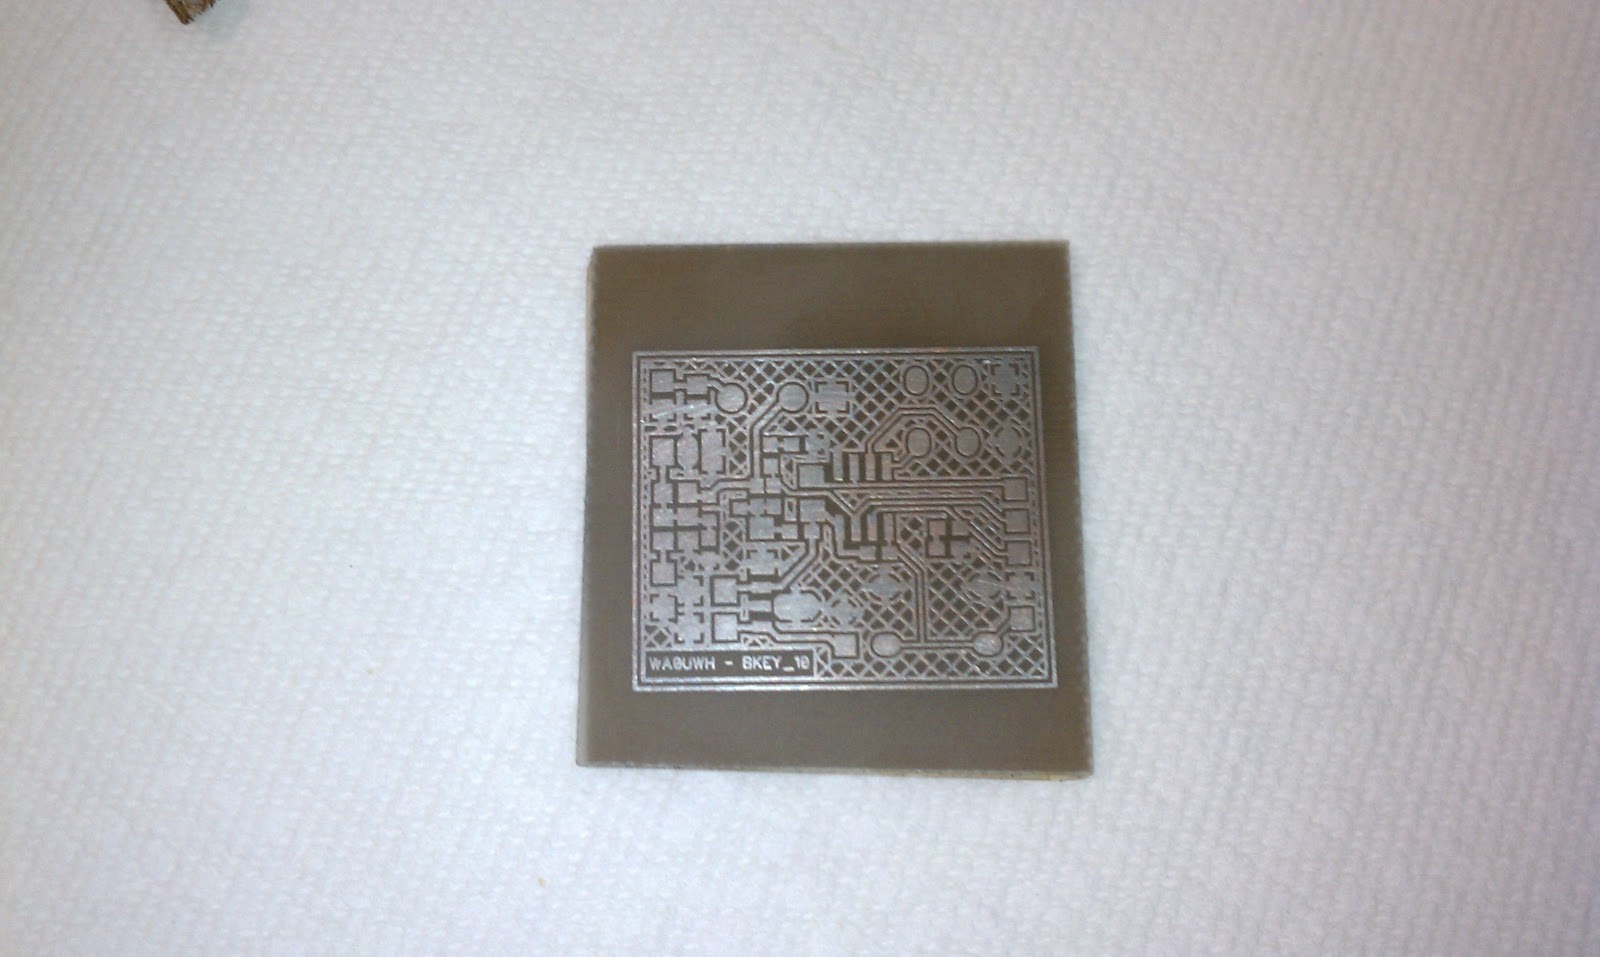
Ready for Trim and Parts

Note: I may have rubbed too aggressively while removing the shine, as the solder wipe is now very thin.

Total time from laser print to finished board:  about 20 minutes.

Note: Unlike all previous posted photos on my blog, for this post I used my HTC Droid Cell Phone Camera. It looks like I could use a Macro Adapter for the phone - I will look into its availability.

--

Tuesday, November 3, 2009

Industry Standard Small Traces

Today I read that "Industry Standard Small PCB Traces" are normally as small as 6mils.

Because I like small things, I wanted to try to build a circuit with even smaller traces.  The circuit I choose is a new iteration on my Micro Power QRSS Transmitter - the same circuit that was used on the QRSS test that I ran last week.

I have re-designed the board for ALL 1206 SMD parts, using 5mil traces and 8mil clearance. I would have liked to use smaller parts, but 1206 size parts are the smallest that I have available. The traces do not need to be this small, I am just doing it to see if I can? - It is kind of a QRP thing for the Home Brew PCB Fabrication process!

The Toner Transfer and Etch process went well - The board DC Resistance checks OK, without loss of connections or shorts.

The size of the board is 1000mil x 850mil,
shown here at about 4X actual size.

The signal traces between pads are 5mils wide, 8mil clearance.
The GND Grid is 5mil Traces on 20mil Centres.
The Font is 3pt.

The major components of the circuit are; a 5 Volt Regulator, Crystal, 2N3904 Oscillator, and a KID2 QRSS ID'er.

Note: SMD 1206 parts are: 12mils long and 6mils wide.

The next step is to mount the parts - which could be a real challenge, . . . . for tomorrow.

-

Monday, November 2, 2009

A new QRSS Contact

This morning while working in my shop getting frustrated with progress on trying to get a new DC Receiver working, I abandoned work for a while.  I plugged the computer sound card back into the R-2000 general coverage receiver and turned the dial. I noticed a several signals as reported by ARGO on the computer screen, that is normal noise within the sound card and the ground loops from the receiver, I really need to get a better interface. Most of the displayed signal lines on the screen are steady and associated with 60Hz.  Nothing unusual here.

A minute or so later, I check the screen - there was a single perfectly formed QRSS3 "C" on one of the hum lines!!! What, did I touch something that caused the receiver to jump frequency in time with a perfect QRSS3 "C" - I don't think so.  Where did it come from???  I continued to watch, nothing suggested it was anything but a 60Hz hum line.

Several minutes later, on the same line was a perfect QRSS3 "O"!!!

Now this has my interest!

Who would be sending QRSS3 letters at such a slow rate??, And what was the rate??

I started a timer and put the Grabber into capture mode, and waited, and waited - Eleven minutes later - a perfect QRSS3 "N" - WOW - I have to watch this! Someone is sending some very slow QRSS - I am excited - I have to figure this out!


I can't touch anything - not even the dial - I'll just have to wait!!


At the next Eleventh minute, right on schedule, I could see the leading edge of a letter, BUT at that very moment my "WSPR" transmitter obliterated the receive signal. I did not get that letter.


Who ever is doing this must have an synchronised clock and is transmitting single QRSS3 letter at the begining of minute interval. This has really got me interested! WSPR transmits precisely on even two minutes intervals and then receive-only for (in my case) 20 minutes.  To avoid having WSPR obliterate another letter, I turned WSPR off. I checked my (other) standard local Grabber, I could see the same signal there - but a little weaker - a different antenna is used and maybe my long wire on the R-2000 had an advantage at the right direction.

I computed the time for the next letter, and waited. Right on schedule, A perfect QRSS3 "W" was recorded. I now have "CON_W" received over a 50 minutes period. I wonder what the message would say and to/from whom?


Ten minutes later, a perfect QRSS "A" was received - the first part of a CALL?? - maybe the first few letters, was the last part - I checked the QRZ data base for "WA something CON" - the QRZ database does not have option letter search (that I know of) - no joy.


Ten minutes later, a perfect QRSS "0" (zero) was received, although the frequency was shifting down - NOW this is part of a CALL! - Checked the QRZ database again with "WA0CON", checked Google - still no joy.  I will just have to wait for more of the message.


Now, I started wondering, who would transmit QRSS3 at such a slow rate?  Who ever it was must be on a battery because I could see the tell-tale frequency shift of a heavy loaded transmitter - transmitting a long "zero" for that last received letter.

What could have been the letter that I missed, while my WSPR was transmitting?? an "R", "K", or a comma?? - What kind of message could this be??

I started thinking about my old beacon messages, which consists of something like the following:

"BCON F WA0UWH (CWID)"

THAT'S IT!!!

"BCON _ WA0UWH (CWID)"

BUT, I don't have anything that transmits single characters at 10 minute intervals - or, do I?

There, On the shelf, was the previous weeks experiment, the dead 9Volt battery QRSS Transmitter, with the battery still attached, just as I retrieved it from the cold, wet, centre-insulator of the dipole several days go. See previous experiment.

To make sure this was NOT transmitting, I pulled the battery clip off - the signal went away! Dang!


The extremely low battery voltage must have put the KID2 Keyer (PIC) into some kind of very slow mode, as the characters were being generated one per 10 minute intervals. This is not a normal KID2 Keyer or QRSS mode! Transmit power must have been extremely low, the warmth of the shop must have re-activated the battery (a little), when I turned on the shop heat this morning.

For about 90 minutes, this was a very exciting chase, with a little bit of a let down, but that is what ham radio is all about, chasing signals, even when they are your own!

It was a real rush, even though it was from my own system.

But, I will never ever trust dead batteries again!

-