Showing posts with label Launcher. Show all posts

Saturday, August 20, 2011

Safety Fire Control Switch Needed

I got to thinking last night, after the test firing of the Tennis Ball Launcher (see previous post).

The Tennis Ball Launcher is maybe a little un-safe, and it is little touchy on the release trigger. As stated before, a simple inline safety switch could help avoid an accident.

Safety additions will help make putting up Antennas in trees, just that much more enjoyable.

But, this thing is just BEGGING for a little bit of automation.

Current Jury-Rigged Trigger
Orbit P/N 57101
Something that would allow a user to safely arm the fire control circuit, and maybe provide some DRAMATIC sound effects.

Maybe something like the sound of a cheap camera charging it's flash. It would be fun, and this would also alert by-standers, and Tess to be ready for retrieval.

I am thinking, For Arming Fire Control 
  • From Idle
  • Quick push and release
  • Up Ramping Tone, followed by push, 3 second hold and Release
  • Med Tone, One second delay, flashing  Blue LED
  • High Tone, Fire on next Release if within 3 seconds, flashing Red LED, Else ABORT
  • Down Ramping Tone
  • Return to Idle

To Change Valve Open Time
  • From Idle
  • Push, hold for 4 seconds
  • Report CW "P" (for Program Mode)
  • Quick push and release, with "boo-bonk" sound report for down
  • Two Quick push and release, with "boo-bink" sound report for up
  • Repeat two above, unless timeout
  • Report via CW "R" sound
  • Return to Idle

To Reset (ie reboot) 
  • From Idle
  • Push and hold for 6 seconds
  • Report via CW "R" sound
  • Return to Idle

This style of human interface is used by the K1EL CW Keyer, which I find very usable. To provide tones and switch monitoring at the same time may require interrupt programming. A low idle power processor would avoid the need for a power switch.

The Valve Open Time would avoid un-necessarily expelling air after the Tennis Ball has left the barrel, which would be useful (but maybe a little dangerous when reloading?).

This would take very little SMT hardware and could be made on a very small PCB:
  • A user interface push button switch
  • Processor
  • A Small Piezo Speaker
  • Maybe an LED or two
  • A FET and/or Relay to drive the Air Valve
  • A few Headers for the 9 Volt Battery, Valve Connection and maybe a JTAG

The circuit board can be created quickly with the Toner Transfer Method as used by my other project.

Now all I need is to find a low drain power processor, and re-learn my programming skills, 

Or, maybe someone would want to help?


UPDATE
Experiments today shows that I can save about 1/2 of the air charge by limiting the air valve open time to just that which is needed to shoot the ball from the barrel. But, this also may imply that there are some restrictions within the system; maybe the Valve, the bottle necks or the pipe size.

--

Friday, August 19, 2011

Tennis Ball Launcher - Cont'd

The Preliminary Tennis Ball Launcher Performance Results are In.

Note: this is an implementation of the Triitent Pneumatic Launcher.

Using the Launcher, an antenna will be strung in my trees before long. I am still waiting for the Bow Fishing Reel and Line to arrive.

Also, see previous posts; here and here.

The first few low pressure test shots in the Shop scared Tess (my Dog) to death, it sounds like a fog horn.  But later outside shots, where the sound did not reverberate, and where there was a ball to chase became great fun for her. Although Tess has not yet learned to look up, to see the ball fly, she usually waits for the first bounce, and then she is all over it!

Jury-Rigged Switch and Battery
The first few outside shots were at low pressure and with an un-weighted ball. It became clear after the first few shots that I need to hook-up the electric solenoid to a switch, instead of just using loose wires connected to a 9 Volt Battery. I jury-rigged a switch and battery with tape to the launcher.


Now it was time to try some high pressure shots.

The first high pressure shots were at 10, 20, 30, 40, 50 and then 60 pounds, with an un-weighted ball. Tess retrieved each with pleasure.

Fill Connection and Pressure Gauge
The Mountain Dew Bottle was used for it's Extra Buzz :-)
Read for Test Launch
Most web Tennis Ball Launcher users weight the ball by inserting 16 pennies (via a cut slit). Tess could not figure out what I was doing to her ball, and then she found it strange, it rattled when carried or rolled. We played catch with the weighted ball for a few minutes, and now thinks it is normal. I also threaded a cable tie through two holes (across the penny slit) for tying a streamer and later a fishing line.


So now, for the first weighted shot; A Tennis Ball, containing 16 pennies, a 3 foot red marking tape streamer, and at 60 pounds of pressure.

When shot almost straight up, the weighted ball when above the top of a tree in the drive next to the Shop.

Now, how high was that?

I am not very good at estimating height (and, I do not have a sextant or barometer to drop :-).

But, I do have a Cell Phone, with an APP, . . . a Level with voice output. Moving away from the tree and sighting along the edge of the phone to the top of the tree, until the level spoke the words for 45 degrees, I can now measure the distance to the tree and add 6 feet for my eye level. The tree was 40 large paces away, plus 6 feet, implies the tree is 40 x 3 + 6 = about 126 feet.

My first full pressure, weighted ball, shot went up about 126 feet !!!!!

An attached fishing line may reduce the performance (the bow fish reel still on order).

For several more shots (and until it got dark) Tess was have as much fun as I, shooting this thing.

There were several things noticed that may need refinement:

  • A lot of air comes out after the ball has left the chamber, which implies that the valve may be restricting the flow, maybe a double value is necessary? Or, maybe the current 26 inch barrel needs to be longer?
  • The trigger switch worked well, but it seems un-safe. I initially considered a inline safety toggle switch and I may still install one.


But, What Fun !!

More later.

--


Thursday, August 18, 2011

Tennis Ball Launcher, Cont'd

I have collected parts and started the Tennis Ball Launcher,  which will be used to put wire Antennas into my trees. See my previous post.

Note: this is an implementation of the Triitent Pneumatic Launcher.

Adding Screw Thread to build an Adapter
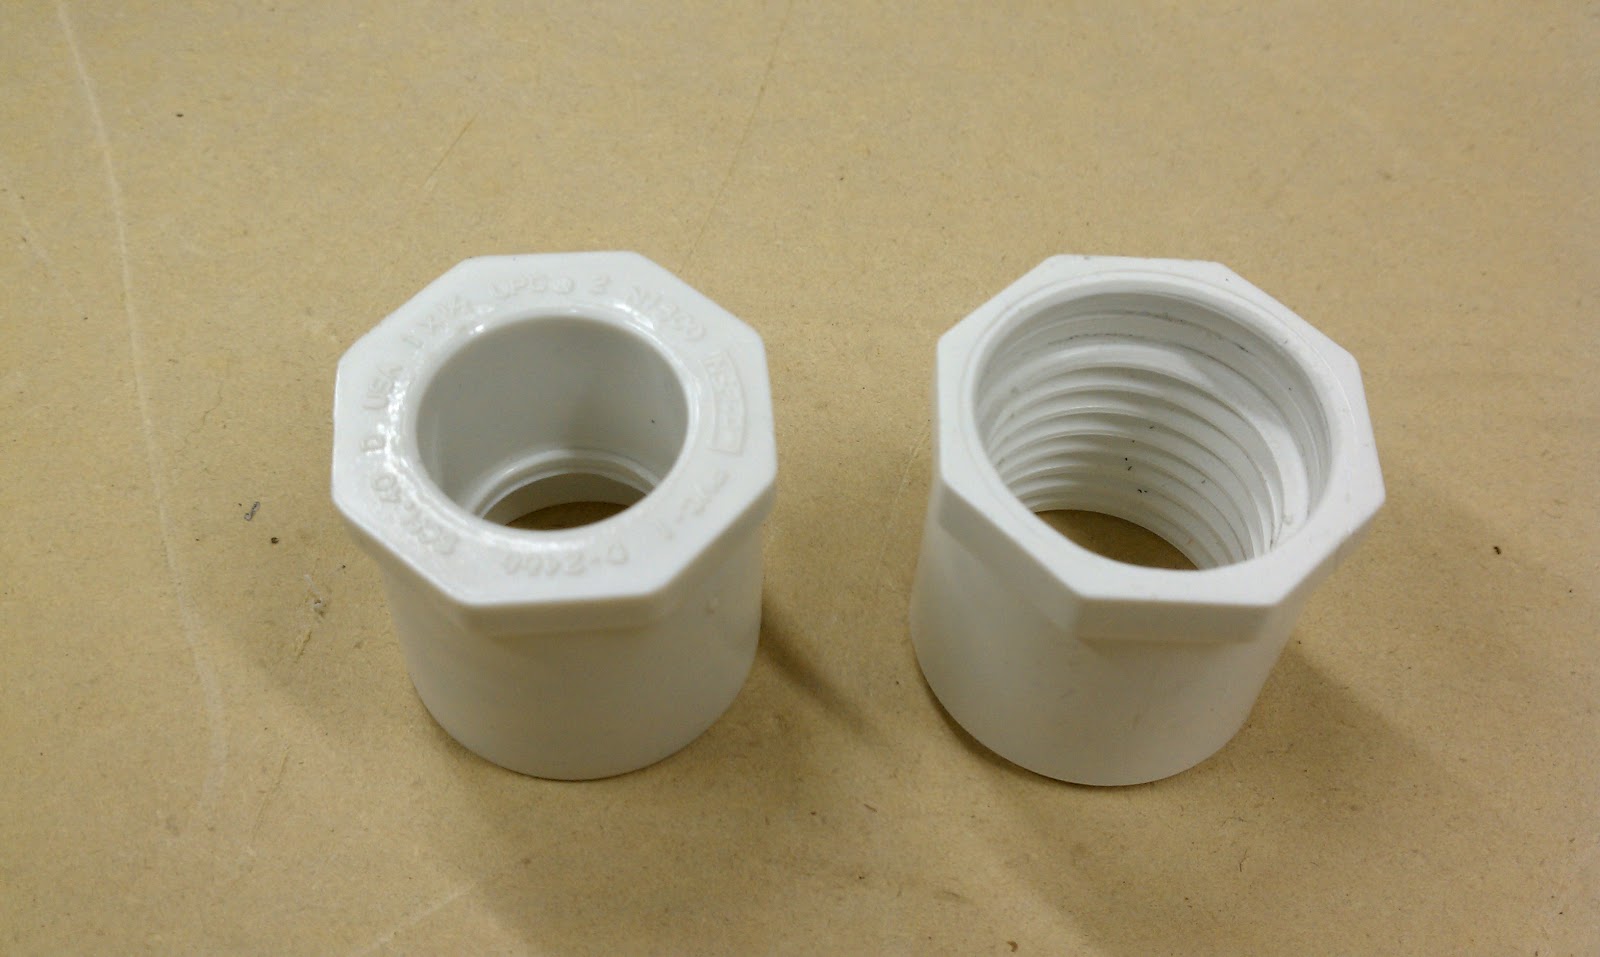
First I had to build an Soft Drink to PVC adapter, most of the similar documented build use threaded inserts that are glued together to make this adapter. But with a lathe, the task was easy to convert an existing 1 inch to 1/2 inch slip adapter to the required threaded configuration.

While looking at a soft drink bottle, it appears the threaded area already has a place for an o-ring, so all that is needed is a thread and an o-ring landing.

The results may provide a stealthy leak proof adapter, note this has not been tested yet. Details will follow.

Original and as Modified
In case someone asks, a 1 liter soft drink bottle has 8 thread per inch, I don't think it is Metric, but it is hard to determine on such a short thread length.

Most documented builds use existing plumbing fittings as they are purchased, and there is no reason not. But for my build I decided to change the shape of the main fitting to be more pleasing to the eye.

Parts As Purchased
The main fitting connection to the barrel is with a coupler and adapter, or a modified cap and adapter, as used by the Triitent Pneumatic Launcher.

For my build, I modified the fittings as shown.


As Modified
Not much was done to the Coupler

As will be used

The preliminary dry fit shows how it all should look when (almost) completed.
Dry Fit
The Trigger, Third Bottle and Barrel to be Added
Note: I have not finished drinking the content of the third bottle, yet, . . burp :-)

The Trigger method has not be solidified yet, most documented Launchers use a standard electric underground sprinkler valves, modified for direct Pneumatic action.

This should be a very light Launcher, and maybe used over the shoulder for best aiming. This will be fun to shoot and use. Tess (my Dog) retrieval will make it just that much more enjoyable.

--

Monday, August 15, 2011

Tennis Ball Launcher

Ham Radio is not ALL about Electronics and/or QSO's ?

For the last few days I have been searching and collecting the parts to build a Tennis Ball Launcher, the goal is to Launch lines over the trees around my Shop for several Dipoles.

Previously I had collected Pulleys and Lag Bolts with plans to hire a tree climber to install the supports for an antennas.

Rod Ready to Fire
But, during Salmoncon (see previous post), Rod - KE7X showed me how easy it is to put lines over very-very tall trees for supports, using a Tennis Ball Launcher. In fact, the Tennis Ball Launched line can be put higher into a tree than possible with a tree climber.

I got-to-have one of these!

A little web research suggests there are many designs and configurations for a Launcher.

The first problem is finding right size Launch Tube, a Tennis Ball is about 2.65 inches in diameter. Standard 2.5 inch Schedule 40 PVC pipe is about (as you might expect) 2.5 inches inside diameter. A Tennis Ball can be forced into this tube, with a ram of some sort. Many designs found on the web use this commonly available size PVC pipe (with a ram), and apparently they work quite well.

But, Rod (and other web users) suggest it is worth finding a length of lesser-available "2.5 inch SDR-21 PVC Pipe", a Tennis Ball fits fuzz tight in this slightly thinner wall pipe. The fittings for this size are readily available as they are are the same as used for normal Schedule 40 PVC pipe. Although 2.5 inch pipe and 2.5 inch fittings are not available at the standard Box Hardware Stores (Lowes).

With a little Googling, I found a local Whole Sale Plumbing Supply house that stocked 2.5 inch SDR-21 pipe in 20 foot lengths, and the price was not bad, at $22.00 per stick. They also had the fittings. I will add a parts list here (that I will use) later.

The next task was to find a valve, the larger the better, but at a reasonable price. There are several types and vendors available from the Box Hardware Stores. The valves are typically used for under ground sprinklers which are power and controlled by a timer. I wanted at least a 1 inch valve. Most newer Launcher designs seem to use one of this size. Rod's design (and other web users) uses two valves in parallel for more air flow, I may try two valves later. Some of the available values are complex and are overkill for a simple launcher. I found a simple One Inch Orbit Valve (#57101) for $12.00, we will see how well it performs.

The next task is to decide on the fill connection, pressure gauge, and release trigger mechanism. The fill connection and Pressure Gauge were found at an Auto Parts store, the gauge is a little bigger then I want but it will do.

For initial trials, I will use the standard electrical connection to the valve for the release. Rob, and most web users modify the valve to allow for simple pneumatic release and therefore not requiring a battery. The valve I purchased appears to operate correctly with just a 9 Volt battery, and yet it is simple enough that can be modified for pneumatic release if necessary.

Most published designs use a PVC pipe with caps for the air reservoir, I found one design, The Trident, that uses plastic coke bottles, which make the Launcher much lighter. I think my initial design I will try this approach. I am drinking the content of the first bottle as I write.

More details will follow !

--