I have installed the few K1EL Keyer required componenets on the QRSS Beacon Project (see previous post). With so few parts I did not expect any problems, but it is nice to see something working.
That was easy, this is the first video that I have posted via YouTube, it was recorded via my HTC Droid Cell Phone - it was easy enough, maybe more will follow.
--
Monday, February 14, 2011
Mouser Label Fades
I have been buying parts form Mouser for a long time and have a lot of parts, one of the things that I like is the attached label for each bag of components - it is nice neat consistent label, with descriptive, reorder information, and it contains my PO number for that purchase. It is a very nice and useful parts storage and sorting label.
BUT NO! - one year old Labels are starting to fade - Mouser what is wrong with your bag labels ?????
Most of my SMT parts are less than two years old, some labels are now unreadable. I keep like-parts in plastic tubs, in a heated area of the shop. Light is only provided via over head florescent fixtures and they are only on a few hours a day.
I am not sure what the problem is,

Please, Mouser replace your (environment friendly - user unfriendly) label printer, with a more permanent printing solution.
For other Mouser Customers, I suggest you save-your-own-bacon and hand-write on your Mouser Labels until this is understood and maybe fixed.
I DO NOT like having this problem.
UPDATE
I have placed a "Open Letter to Mouser" on the HomeBrew_PCB Yahoo Group List - many list user responses have been received.
UPDATE
When I order parts I always order more than I need, and therefore I always need to store the extras. In the old days, individual parts were easily identifiable with large lettering or color codes. With SMD parts, bag tag labels are very important to help manage and store parts - very small SMD parts without bag tag labels are almost worthless.
I think there are three or four solution to this problem, with my prediction of possible success:
UPDATE
Here is my on-line Chat with a Mouser Rep (or, maybe a bot?)
UPDATE, GOOD NEWS
Mouser has responded on Aug, 23, 2011, see my post at: http://wa0uwh.blogspot.com/2011/08/mouser-fixed-component-bag-labels.html
--
BUT NO! - one year old Labels are starting to fade - Mouser what is wrong with your bag labels ?????
Most of my SMT parts are less than two years old, some labels are now unreadable. I keep like-parts in plastic tubs, in a heated area of the shop. Light is only provided via over head florescent fixtures and they are only on a few hours a day.
I am not sure what the problem is,
- Have I caused the problem by my storage method?
- Is it maybe, plastic out-gas that effect the print?
- Is the ink supposed to fad away in preparation for land fill?
- Or, is the paper, or ink just junk? or maybe RoHS?

Label on the Left is OK
Label on the Right is almost GONE.
Please, Mouser replace your (environment friendly - user unfriendly) label printer, with a more permanent printing solution.
For other Mouser Customers, I suggest you save-your-own-bacon and hand-write on your Mouser Labels until this is understood and maybe fixed.
I DO NOT like having this problem.
UPDATE
I have placed a "Open Letter to Mouser" on the HomeBrew_PCB Yahoo Group List - many list user responses have been received.
UPDATE
When I order parts I always order more than I need, and therefore I always need to store the extras. In the old days, individual parts were easily identifiable with large lettering or color codes. With SMD parts, bag tag labels are very important to help manage and store parts - very small SMD parts without bag tag labels are almost worthless.
I think there are three or four solution to this problem, with my prediction of possible success:
- 2% - Part vendors will understand the problem and update to better printing equipment.
- 95% - We users will print on our received labels enough information to get by.
- 10% - Part vendors will provide Tag Printing option directly from their web site. Mouser has a "Order History" page where an additional printed format could be added to print labels. Two print options already exist.
- 20% - Someone will produce an App to extract information from an online source to produce labels
- 40% - The first part vendor that helps solve this problem will see an up shift in market share.
UPDATE
Here is my on-line Chat with a Mouser Rep (or, maybe a bot?)
Please wait for a Web Chat Representative to respond.
Tamara: Good Morning Eldon, how may I assist you?
Eldon Brown: Hello Tamara - I have a problem,
Eldon Brown: After several years of ordering parts from Mouser, and carefully storing my small SMD parts,
Eldon Brown: in containers with the Mouser Shipping tags on each for later referance,
Eldon Brown: I now find that the Tag has Faded and can no longer read it. All other hobby people like,
Eldon Brown: myself have the same problem.
Eldon Brown: Can Mouser Help - maybe use better ink on part tags? or,
Eldon Brown: maybe provide a Tag printing method from the order history screen, that would print labels on our own printer?
Tamara: I do apologize that you have experienced this, however at this time I am not able to print labels.
Eldon Brown: Are you real, or a bot? I do not need you to print the labels, I am asking if Mouser would concider adding a print function on the Order History Page to print laser Tags on my printer, It would help when I reorder.
Tamara: I can forward your request to my manager to see if we are able to print the labels for you.
Tamara: Can you please provide the part number and invoice number that it was purchased on.
Eldon Brown: This is an example, 12/15/2010-25011794, I would like a print option, so that I can print part labels on my laser printer.
Eldon Brown: I would consider moving to another part vendor, it they provide easy access to part label, I would like Mouser to be first to solve this problem for all user.
Tamara: I have spoke with my manager, this is a request that we will have to forward to our IT department to see if it can happen.
Eldon Brown: Thank you - that would solve a problem for many Mouser Users, See: http://wa0uwh.blogspot.com/2011/02/mouser-label-fades.html
Eldon Brown: Thanks,
Eldon Brown: ELdon
Tamara: You're Welcome
Tamara: Is there anything else I may assist you with?
Eldon Brown: No thanks, I hope to see action soon, Good by.
Tamara: Thank You for chatting with Mouser and have a nice day.
UPDATE, GOOD NEWS
Mouser has responded on Aug, 23, 2011, see my post at: http://wa0uwh.blogspot.com/2011/08/mouser-fixed-component-bag-labels.html
--
Sunday, February 13, 2011
Back to Soldering
I have been having fun with the FUNcube (see previous posts) and ignoring my soldering iron lately, to solve that problem I decided to complete the design of my QRSS Beacon. This project has been in the design stage for sometime, I have been working on; Designing the Circuit, Finding Parts, Creating the Schematic, and PCB layout.
This is will be the first of two Beacons using this design:
For this design I am using a K1EL Keyer, which with be programmed with a CW KEY and then put into QRSS Beacon Mode.

As stated before, I enjoy building very small projects:
I have created similar QRSS Beacons before, this is the first which can be programmed just before use, or used interactive via a CW Key for demonstrations.
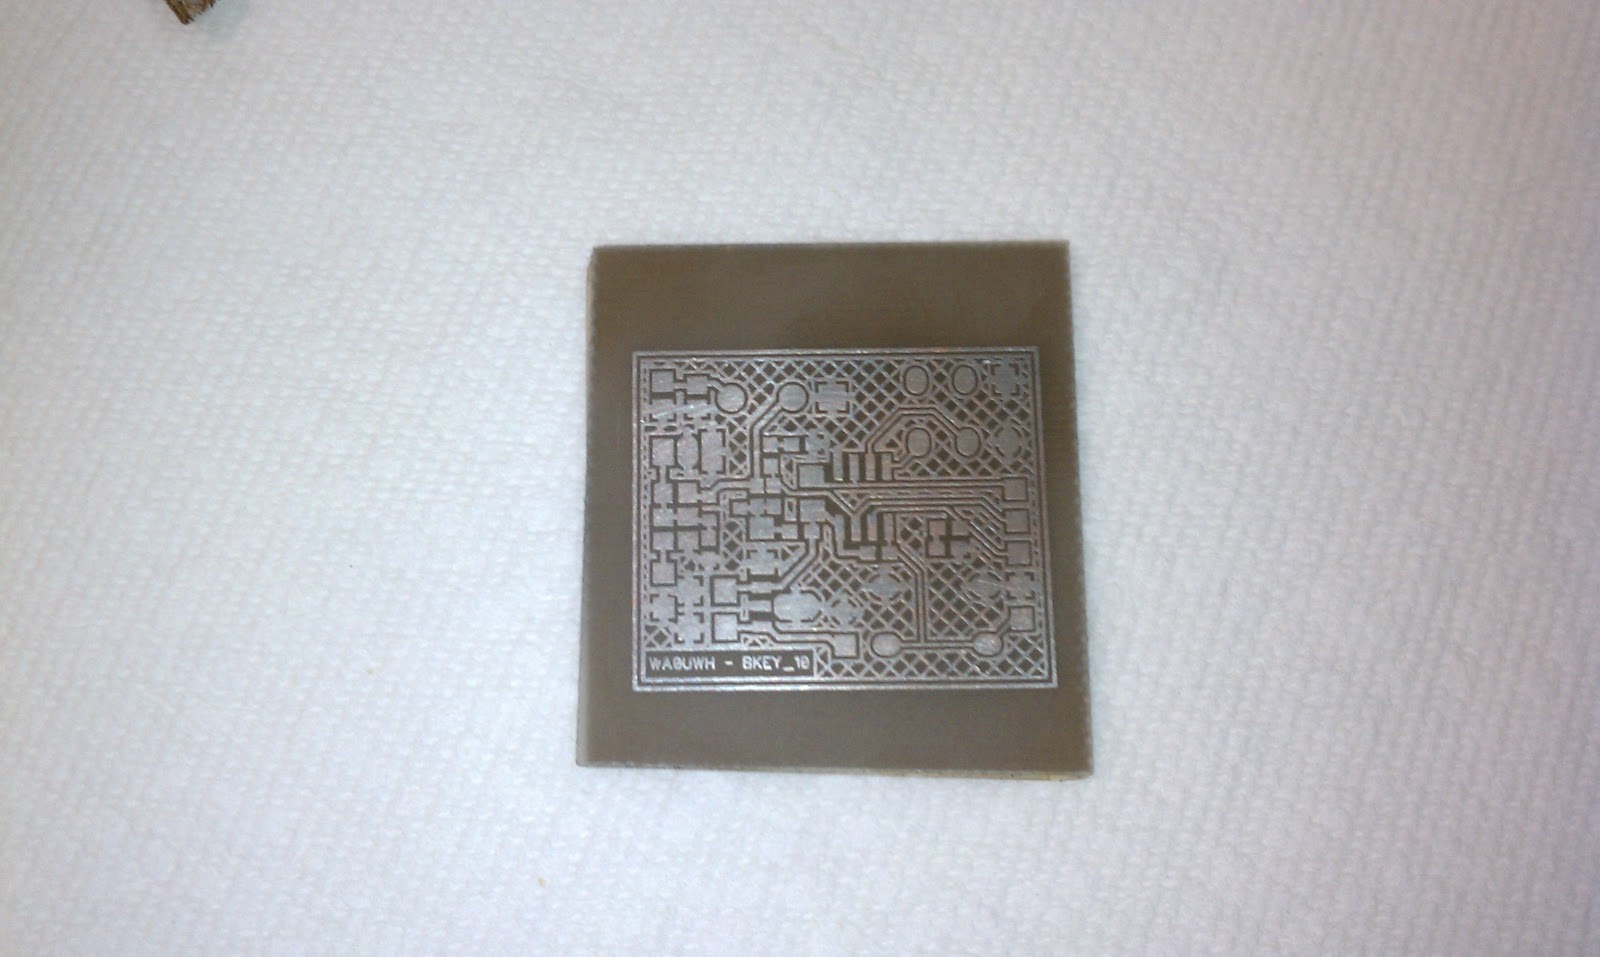
This board measure 1.25 by 1.05 inches. The small traces are 8 mils, clearance 12 mils, the text font is 3pt, the ground grid is 8 mils on 36 mil center. I wanted the board to be only 1.0 inch wide, but just could not squeeze the last .05 inches from the width.
So far, as reported here, I have created the board using Toner Transfer, and plated it with solder wipe. Parts with be added for the next blog post.


Previously I have normally use a soft spoung brush method of etch, this time I am going to try something new (as seen on the web) - I going to try the "Etch in a Bag" method.


I found this method very easy and uses very little etch. I was able to heat the etch while in the bag, by running hot water over it - it etched the board very fast. Also, I noticed that it is best to NOT allow the etch near the zipper - it will creep out while zipping and un-zipping, and will make a mess.


Solder Wipe is done by sliding a short section of Solder Wick over the traces with the tip of the soldering iron. With very little solder on the wick, solder coats the traces, and excess is removed by the same wick in a wiping action. This is best done in the presents of plenty of rosin flux.
After clean up; with Alcohol and more Scotch Bright (to remove solder shine), and a new thin layer of Rosin for protection. If un-removed, the solder shine is very distracting while placing components.

Total time from laser print to finished board: about 20 minutes.
Note: Unlike all previous posted photos on my blog, for this post I used my HTC Droid Cell Phone Camera. It looks like I could use a Macro Adapter for the phone - I will look into its availability.
--
This is will be the first of two Beacons using this design:
- The first is a prototype or proof of concept
- The second (if all goes well) will be mounted within an insulator of a dipole, or maybe launched with a balloon.
For this design I am using a K1EL Keyer, which with be programmed with a CW KEY and then put into QRSS Beacon Mode.

As stated before, I enjoy building very small projects:
"As small as I can - to see if I can - as long as I can, . . . see"
I have created similar QRSS Beacons before, this is the first which can be programmed just before use, or used interactive via a CW Key for demonstrations.
This board measure 1.25 by 1.05 inches. The small traces are 8 mils, clearance 12 mils, the text font is 3pt, the ground grid is 8 mils on 36 mil center. I wanted the board to be only 1.0 inch wide, but just could not squeeze the last .05 inches from the width.
So far, as reported here, I have created the board using Toner Transfer, and plated it with solder wipe. Parts with be added for the next blog post.

After Lamination, All Goes Into Warm Soapy Water

Toner Transfer Paper Floats Away
Previously I have normally use a soft spoung brush method of etch, this time I am going to try something new (as seen on the web) - I going to try the "Etch in a Bag" method.

Ready for Etch

Etch in a Zip Lock Bag

With this method, it is easy to watch the progress and mix the solution
I found this method very easy and uses very little etch. I was able to heat the etch while in the bag, by running hot water over it - it etched the board very fast. Also, I noticed that it is best to NOT allow the etch near the zipper - it will creep out while zipping and un-zipping, and will make a mess.

Ready for Resist Removal, I use warm running water and Scotch Bright

Solder Wipe with lots of Rosin
Solder Wipe is done by sliding a short section of Solder Wick over the traces with the tip of the soldering iron. With very little solder on the wick, solder coats the traces, and excess is removed by the same wick in a wiping action. This is best done in the presents of plenty of rosin flux.
After clean up; with Alcohol and more Scotch Bright (to remove solder shine), and a new thin layer of Rosin for protection. If un-removed, the solder shine is very distracting while placing components.
Ready for Trim and Parts
Note: I may have rubbed too aggressively while removing the shine, as the solder wipe is now very thin.
Note: Unlike all previous posted photos on my blog, for this post I used my HTC Droid Cell Phone Camera. It looks like I could use a Macro Adapter for the phone - I will look into its availability.
--
Saturday, February 5, 2011
FUNcube with HDSDR
As stated in the previous post, I now have the FUNcube working as recommended, with "WRplus" and Firmware 18f.
But, I like the "HDSDR" interface better than that provided by "WRplus". I use "HDSDR" for all other SDR projects and products (i.e, SoftRock).
HDSDR provides multiple VFO's (A and B), up to ten notch filters, and can displayed with other desktop windows.
So, while experimenting with FUNcube, I copied the "WRplus" suggested "ExtIO_FCD_GOMJW.dll" into the "HDSDR" program folder, and started the program.
To my pleasant surprise - it WORKED!
Also, with more digits, "HDSDR" appears to tune the full range of the FUNcube (64 -1700MHz), above the "WRplus" limit of 999MHz. A signal source and more testing is needed.
Note: "HDSDR" and "WRplus" are both spin-offs or modification of the original "Winrad" program.
Unfortuantly via some of my experiments, I have messed-up (or reset) the I/Q balance parameters, therefore currently the decoding is not working very well - I just need to find more doc's to make the adjustments - more information will be posted here.
I still need to figure out how to calibrate the FUNcube LO - the NOAA Weather Station of 162.55MHz is reported 6kHz off frequency - more things to read and learn.
More experimentation is needed with HDSDR and FUNcube to verify they will really play together.
Currently all of my use of HDSDR and FUNcube is on MS Windows XP, my goal is to have all of this working on Ubuntu 10.10 workstation.
- Follow the FUNcube Label Link below to follow ALL of my FUNcube adventures.
UPDATE:
I understand the WRplus is no longer available for Free, and older copies have now expired and no longer work.
-- Home Page: https://WA0UWH.blogspot.com
Friday, February 4, 2011
FUNcube - Fun
I got my FUNcube working with MS Windows XP using WRplus and Firmware 18f.
Now, changing the received frequency is a simple flick of the mouse wheel, while the cursor hovers over one of the LO frequency digits.
Now, changing the received frequency is a simple flick of the mouse wheel, while the cursor hovers over one of the LO frequency digits.
So now - the FUN begins!
The first test was to listen to the local 2m Repeater on 146.82MHz, and then the obligatory 162.55MHz NOAA Weather Station. For each the FUNcube reported the frequency was off by about 6kHz - which suggests that I need to Calibrate the FUNcube LO - just as soon as I figure out how with the new control interface?
UPDATE:
- Follow the FUNcube Label Link below to follow ALL of my FUNcube adventures.
The first test was to listen to the local 2m Repeater on 146.82MHz, and then the obligatory 162.55MHz NOAA Weather Station. For each the FUNcube reported the frequency was off by about 6kHz - which suggests that I need to Calibrate the FUNcube LO - just as soon as I figure out how with the new control interface?
I found the following Band Plan Chart useful while using the FUNcube.

With the wide receive frequency range (64 - 1700MHz) of the FUNcube you need a "Program" listing. I plan to collect detailed frequency listing as they are found.
UPDATE
With the wide receive frequency range (64 - 1700MHz) of the FUNcube you need a "Program" listing. I plan to collect detailed frequency listing as they are found.
UPDATE
Jeff - KO7M, found this interesting Frequency Reference List for authorities and agencies around the country, it includes the Trunking Frequency Lists.
http://www.radioreference.com/apps/db/
UPDATE:
I understand the WRplus is no longer available for Free, and older copies have now expired and no longer work.
- Follow the FUNcube Label Link below to follow ALL of my FUNcube adventures.
--
Tuesday, January 25, 2011
FUNcube - Fun
After the initial FUNcube test (see previous post) I wanted to try to find my cell phone transmitted signal.
UPDATE
But there are two problems;
- I do not know the transmitted frequency of the cell phone.
- And, searching for a signal within a 35MHz wide band while looking at just a 40kHz segment on the waterfall, is problematic. I just could not change the LO Frequency fast enough to make the search reasonable.
Finding a signal with a known frequency should and will be easy. But, finding a particular signal at a unknown frequency within the FUNcube's very wide frequency range (65MHz to 1.7GHz) will take some real effort.
I think my cell phone transmits on the 880MHz to 915MHz range - but I need to do some more Internet research.
The digital cell phone signal can not be decoded into audio by the FUNcube, but it will make for an easy FUNcube demonstration using only a short wire antenna, once I find the right frequency.
UPDATE
On MS Window XP, Setting the FUNcube LO Frequency Calibration from 999885 to 999854 corrected the previous erroneously reported FT-817 to 440.000480MHz, until I have something better for a Frequency Standard, this will do.
So far, I have not figured out how to set the FUNcube LO via Ubuntu 10.04 (the computer of choice). The HDSDR program running via Wine, decodes the audio, but I can not set the LO Frequency. Also, the FCHid.exe Control Program runs. but it can not find the FUNcube.
--
Monday, January 24, 2011
FUNcube
FUNcube - Received
My FUNcube - S/N 212 - was received today (near Seattle) after 10 days in route, see previous post for ordering adventure.

It came in a small static bag, within a neat little soap box (great idea), inside of a bubble wrap envelope, with lots of postage, routing and customs declaration stickers attached.
Within 15 minutes of arrival, I was listening via a short wire for and antenna.
I used the suggested "Windows full-on front end" - the "FUNcube Dongle Frequency Control" software to set the receive (LO) frequency, and I used the "HDSDR" program to view the waterfall and decode the audio. Note: without direct control of the LO from "HDSDR", it's reported frequency was manually set to match that of the FUNcube.
I connected my FT-817 to a shielded Dummy Load (several feet away), and tuned it to 440.000MHz. And then I quietly spoke the word "Test" into the microphone. About one second later my test word was heard on the computer speaker (the delay was the typical SDR decoding delay). The resulting waterfall erroneously indicated the FT-817 was on 439.9865MHz.
It looks like the first test was successful, but the FUNcube LO Frequency may need some calibration.
Now I need to work on building a real antenna, maybe a simple disk cone.
Just, more FUN(cube) and things to learn!
Thanks to: Howard!
- Follow the FUNcube Label Link below to follow ALL of my FUNcube adventures.
--
Friday, January 21, 2011
SMT Soldering 101
For SMT Soldering, this is one of the best SMT Tutorial videos that I have found.
Near the end of the video, there is an interesting suggestion, use "ChipQuik" for easy component removal - I will have to try it!
--
Near the end of the video, there is an interesting suggestion, use "ChipQuik" for easy component removal - I will have to try it!
--
Friday, January 14, 2011
FUNcube
I was one of the lucky ones.
The latest on-line FUNcube sale was to be held today, Friday 14, 2011 at exactly 20:00 UTC. As it turned out, all 100 available units were sold in about 90 seconds.
At 19:59:45 - I was ready:
At 20:00:03 - I pressed the "button".
The results was a sale logged at 20:00:09, and a Paypal email receipt from "Hanlincrest Ltd" created at 20:00:34 !
I am sure many more FUNcubes could have be sold, if they had been available.
The FUNcube is a VHF/UHF (64MHz to 1.7GHz) Dongle SDR Receiver, see:
Now, I just have to wait for the postal service.
- Follow the FUNcube Label Link below to follow ALL of my FUNcube adventures.
--
The latest on-line FUNcube sale was to be held today, Friday 14, 2011 at exactly 20:00 UTC. As it turned out, all 100 available units were sold in about 90 seconds.
At 19:59:45 - I was ready:
- My computer clock was calibrated and in sync with the on-line time standard
- All unnecessary or extra windows and processes were removed from the computer
- My Paypal account was up-to-date
- The FUNcube "Buy It Now" page was on the screen
- My Paypal password was in the "Cut Buffer"
At 20:00:03 - I pressed the "button".
The results was a sale logged at 20:00:09, and a Paypal email receipt from "Hanlincrest Ltd" created at 20:00:34 !
I am sure many more FUNcubes could have be sold, if they had been available.
The FUNcube is a VHF/UHF (64MHz to 1.7GHz) Dongle SDR Receiver, see:
Now, I just have to wait for the postal service.
- Follow the FUNcube Label Link below to follow ALL of my FUNcube adventures.
--
Friday, January 7, 2011
An Extra, as Reported by QRZ
Subscribe to:
Posts (Atom)